Jun 30, 2010

Caught in the Act


This is exactly why I had to employ my tacky gardening techniques to protect my plants with deer netting and cheap stakes until we can afford to do something nicer. At least it works!

Georgia is Back!

Georgia is back from her vacation at my parent's house. She's been living there for over a week, being spoiled rotten while we moved into the house. We didn't think the chaos and construction would be very good for her so my parents have been taking excellent care of her. She's officially about 5 lbs heavier.

Jun 29, 2010

Bedroom Progress

Another day, more progress. We can actually walk in the room today...

Slightly Ghetto Gardening


Over the weekend we moved my balcony garden over to the house. Casualty #2 from moving - I lost 2 of my favorite containers, the tray bent and they went crashing to the ground. Of course the plastic pots didn't fall, just the nice ceramic ones from Terrain.

Since my future gardening plan is to create raised beds in the backyard behind the garage, I wasn't quite sure what to do with the pots this summer. I didn't want to put them where they would burn out the grass, but I wanted them in full sun and to be within reach of the hose. So we stuck them at the end of the turn-around in the driveway. Not really the prettiest place, but we are without a patio and time for landscaping. I then put up some deer netting with 4 stakes because the woods behind our house are basically a deer highway and I wasn't putting out a rest stop buffet.

Unfortunately deer netting does not keep out the thousands of chipmunks that seem to live on our property. Honestly I gave serious thought to exterminating them with juicy fruit gum (they like the taste but can't digest it), but the reality of it is that I can't even kill a plant willingly, let alone an adorable woodland creature. Squirrels are a different story, but chipmunks? They are just so darn cute! One snuck under the deer netting when I came outside. The poor thing was so terrified, running into the netting and getting tangled up and making these pitiful chirping noises in terror - I felt just terrible! I even propped up the netting so he could escape safely. Seriously I wanted to cry and put out apology peanuts (but I didn't!). So much for my stone-hearted approach. Our new solution was to sprinkle some organic animal barrier on the grass around the netting and then hold down the pavement section with rocks. Hopefully that will help. And it looks even more awesome.

Jun 28, 2010

Destruction and Reconstruction

 Here's what the contractors did while we were at work today:

From top left to right: (1) the new, much shorter hallway; (2) the new walk-in closet framed out; (3) the new doorway from inside the bedroom; (4) the massive construction mess in the room (OMG!); and (5) remnants of old 1930s wallpaper that was covered by the closet walls - why couldn't  we have wallpaper like this in the kitchen?! It looks like something I would buy from Anthropologie.

Master Bedroom Mayhem

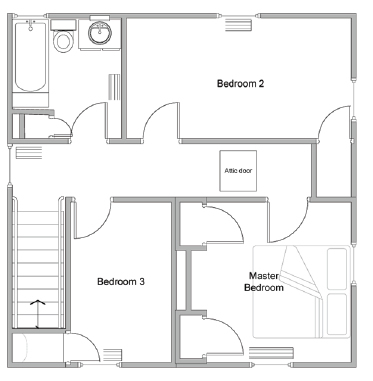
When we put an offer on the house, we knew there were two major drawbacks. First was the half bath - aka the toilet in the kitchen. The second was the size of the bedrooms upstairs. Between the radiators and the closet doors, none of the rooms were large enough for our furniture, including the master bedroom. The way it is right now, our bed was pushed up too close to the radiator and we couldn't fully open the door. I was literally sliding in and out of the room, stubbing my toes for a few days. Before we moved in, we planned a solution to remove one closet, add a new doorway where the closet was, rehang the door, and turn the current doorway into a closet door. We would then add a wall in the hallway, closing off the unnecessarily long hall and give ourselves a walk-in closet.

Current Layout:


Original Plan:

The problem? This new doorway has to be in the main support wall of the house. We talked to a contractor about the problem and unfortunately it is going to cost way more than we thought. As in the last of our money. His suggestion was that if we are going to spend the time and the money to open up the wall anyways (which is the bulk of the labor and cost), for a little bit more he could open up the closet doorway to be a double-wide closet door and make it a true walk-in closet. And he'd add the closet wall for us as well. The plan was also to salvage as much of the original trim as possible and rehang the original door in the new entryway. We decided that with a true double closet, we could eliminate the second small closet as well, giving us more bedroom space. In the end (for resale value) we'll get some return for a walk-in closet, and having room for a king-sized bed will add saleability to the house overall.

So now our plan looks like this:
Originally this house was a 2 bedroom home. Bedroom 3 (our guest room) and the master bedroom were actually one large room with two closets. At some point, a dividing wall was put up, they removed the second larger closet and turned it into the hallway, and added two small closets along the dividing wall. So half our plan is to reinstate the original closet and take back the hallway. Eventually we would like to refinish the floors in the bedroom, but it's a big job. Unfortunately years ago, a previous owner decided to paint the outer 2.5' perimeter of the floor red. Even better, they spilled a bucket of gray paint in the middle of the room and never cleaned it up. So for now, our plan for the room is to get a neutral wall-to-wall carpet in the master that matches the hallway and stairs (which will remain carpeted for Miss Georgia).

Last week when we had the side door replaced to bring the dryer inside, our carpenter mentioned he had a cancellation and he was free early this week if we still wanted to move ahead with the construction. After 3 days of toe stubbing, shin bruising and cursing the tiny closets for not even having enough room for even my clothes - we jumped at the chance. If we don't do it now, we might never do it once we get settled in and fully unpacked. As it was, it was a pain to move all our furniture (even with help!) to the office (bedroom 2) for now. It's so narrow in the office that our bed blocks both the closet and the radiator.

So today they started demolition of the wall and closets. I'm not sure what to expect when I get home (Mom was house-sitting today while they worked). They should be done with the work by Wednesday at the latest. I hope.

Jun 27, 2010

Goodbye Apartment

This weekend we spent most of our time cleaning and repainting the apartment. It was time to say goodbye. Our lease ends Wednesday at noon and we had to spend our last couple of days off earning our full security deposit back. Lots of dust bunnies to swiffer, floors to polish, and walls to paint back to white. Mom wonderfully volunteered to help and got my floors & appliances shinier than I ever could. We also had to clean out our storage unit in the basement, move my balcony garden to the backyard of the house, and collect the last of our things.

It's amazing what paint and a few accessories can do. Empty of furniture and blank white walls, our apartment turned from our home back into a generic apartment. Looking back at pictures, it gives me confidence that if I can make this apartment feel like a cozy home, I can make anything - including this challenging house - feel like a cozy home. 


It's actually surprisingly hard and sad to say goodbye. I know we have moved on to a bigger and better place, but we had a really great 3.5 years there.

Jun 25, 2010

Trees and Doors

Fringe tree, red bud tree, dogwood tree

When we bought this house, our yard had no trees in it. A full quarter acre of land and no trees. There are woods behind our lot that provide shade to the back of our yard, but other than a few plants and shrubs we only had grass. Today my lovely grandparents brought us some beautiful trees that will flower every spring - a red bud that will have bright purple blossoms, a dogwood tree, and a fringe tree that will have fragrant white flowers.  They also brought a few native plants for additional coverage at the base of the trees. They even gave us a soil test kit and a few gardening tools. It was so nice and generous of them.

We planted the fringe tree in the front, then the red bud and dogwood in back near the garage. I think they look great - I'm so excited to see them grow and bloom.


Today also marked the momentous occasion of the dryer finally getting into the basement. The guys from Sears will come back for a 3rd time on Sunday to install it. We had to hire a carpenter to come in and remove the door and door frame, then they kindly moved the dryer into the basement, and then they installed a new door for us. Why a new door?

The original door was very badly hung. There was a 2" gap under the door when we removed the storm door. It turned out the door frame was fake! It was literally just strips of wood they had nailed together with 5 inch rusty nails and then covered with tape. Who does that? With 5 inch nails?! Not only were we losing a lot of cold air, a chipmunk stuck his head through the gap yesterday afternoon. I screamed thinking it was a mouse and scared it away. So while this was a ridiculous and  expensive way to get a dryer into the basement, it really just expedited the terrible door being replaced that much sooner.

Jun 24, 2010

Linen Closet

Most of the credit for the linen closet goes to Katie. She peeled off that disgusting (and vile and super sticky) contact paper, sanded all the old glue off the shelves, sanded the horrible cracks in the walls and ceiling and even painted all the shelves. I finally had a chance to patch and paint the walls and floor. It finally looks so much better and finally feels clean enough to store our clean towels and linens. Now if we could just find those boxes...

The First Casualty of Moving


It's official. We've had our first moving casualty. The victim is a Noritake champagne flute from our wedding crystal set. I guess my warnings weren't scary enough?

We’ve Moved!


We’re in the house. Yesterday the movers came and packed all our furniture into their truck in the 90+ degree heat. We’ve been spending a lot of time juggling boxes, rearranging furniture in the living room for the 100th time (it’s a really awkward room), and attempting to unpack a few boxes.

On Tuesday the electricians finished up their work. More loud crashes, more holes to patch, electrical stuff everywhere all day… but in the end it was so worth it. It might not look like much more than some new outlets and a bunch of holes to patch – but oh to have the AC running, laptops charging and TV on at the same time! It’s lovely! The cable guy came to give us phone, TV, and internet… and we actually had outlets to plug them in and have everything work!

Also on Tuesday the tub re-glazers came. The good news? The tub is now beautiful. The bad news? They had to remove the toilet and Mike had to learn how to put one back on yesterday when we needed to be doing a million other things. Awesome. Oh and the re-glazing process smelled terrible - like a thousand toxic chemicals invaded the house (so glad we didn't sleep here until last night!). But again – it looks like a brand new tub!

We’re still struggling to get the washer and dryer down the stairs. Apparently Maytag doesn’t even make a dryer that would fit through our basement door. We’d have to switch out our set to a set of Kenmore front loaders with flat backs – something I didn’t want at all. So now the solution is to actually take out the door, move the dryer through it, and put in a new door with a professional carpenter tomorrow afternoon.

My New Coffee Tables


Dear Sears,

I would like to thank you for your excellent customer service. Not only did your delivery men kindly leave my washer and dryer in the middle of my living room, but your customer service representatives were so eager to help me resolve the issue that they kept accidently hanging up on me in their enthusiasm. Or transferring me to the warehouse, or accidently leaving me on hold for 30+ minutes until I gave up and called back. It only took 14 phone calls to reach someone who could understand why a washer and dryer blocking the front door wasn’t ideal when you are having your furniture moved in. Unfortunately while my next-day appointment was lost forever, I am pleased to report that all 8 people I spoke to said that they could schedule me a new appointment for sometime next week. In the meantime I’m making excellent use of my new coffee tables.

Best regards,
Alissa

Jun 21, 2010

Plumbing + Electricity + Appliances (sort of)

I have to make this short and sweet. I'm so tired I can barely see straight (let alone write coherently) - it was a crazy day. We have so much left to do tomorrow before we move on Wednesday, it's a little overwhelming. Today Mike had to work a partial day, leaving me in charge of the circus at the house.

The electrician came, day 1 of 2. Lots of large holes in my walls, scary crashing noises in the basement, and adding our new outlets. I got him to pop off half the kitchen back splash, held in with 5" nails like everything else in this house.

The plumber came back, we now have a working sink in the bathroom and shower hardware in the shower. I sealed the tile grout and caulked the seams in the shower, stripped the shower curtain rod with nasty toxic chemicals to get it ready for spray painting. The linen closet is primed and ready for painting.

The appliances arrived in the middle of the day. The refrigerator was delivered, hooked up and looks beautiful in the kitchen. In fact it's the only thing beautiful in the kitchen. The washer and dryer wouldn't fit into the basement. The door from the kitchen inside was too narrow. The basement door from the outside is wide enough, but the storm door wasn't. I measured the door but not the storm door. So the head guy calls Sears, I made an appointment with customer service for them to come back tomorrow to install them, and they leave the washer and dryer in my living room. That evening I called the delivery line to find out what time I could expect the guys tomorrow... and there is no appointment on record. After 1.5 hours of being on hold, being hung up on, being transferred to the warehouse, yelling, frustration and tears - I gave up. The best they could do is come back Friday. We're moving in Wednesday AND THERE IS A GIANT WASHER AND DRYER IN THE LIVING ROOM. Mike then called, actually got a decent human being and got the best they could give us, a Wednesday installation. It's going to be a very interesting move-in day.

Keeping Pace


The bathroom, finally tiled - Kitchen in progress -  Kitchen odd-counter gone - Bathroom walls patched - The tile grouted

This weekend we worked long days, got very little sleep, and got a lot done. Thank goodness for close-by family and friends who are kind enough to volunteer to be my slaves help. We owe big thanks to my parents, Katie & Betty for the weekend (thank you, thank you!). Seriously some house-butt kicking.

On Friday night Mike worked into the wee hours of the night to get all the tile up on the wall - over the new wall patch the contractors put up, over the window and under it. The next step was to grout - Saturday night after a  very long day, very late into the night, we grouted. It took 3x longer than I thought it would and that was with 3 people instead of 2 (thank you Betty!). I thought we might be sponging and wiping forever. The other big job in the bathroom for the weekend were the walls. Mike and I pulled out the medicine cabinet, original to the house (we're relocating it downstairs to the half bath) by pulling out some very impossibly stuck nails. Apparently the house builders didn't like screws back then. Everything in this house is nailed in with large rusty nails. But that's a longer story for another day. We patched the hole with a piece of sheet rock we cut down to fit, screwing it into the frame and taping the seams.

Dad went to plaster our walls (he has some 1920's house experience from their first house) in the bathroom only to discover some crazy water damage behind the toilet in the wall. Chunks of plaster just falling away. This led to a field trip to the lumber yard, purchasing a giant piece of green board, a lot of cutting out in the garage, and creating a complicated corner wall-rebuilding patch with Mike that took most of the afternoon. Wall patching wasn't able to commence until Sunday in the 94 degree heat, with no air conditioning upstairs (not enough power until the electricians add it), Dad kindly rescheduled his Father's Day celebration until after we move to instead toil in hotter-than-hell heat. The walls are starting to look really great.

We also started working on the kitchen. Katie spent Saturday and Sunday sanding my kitchen cabinets, Mom sanded and started priming the kitchen drawers. We don't really have a lot of cabinet space, but boy do we have a lot of doors. And disgusting shelves covered in frighteningly sticky mystery substances that took hours to remove. We pried that odd counter-table out of the wall and removed it from the kitchen. We were thrilled to find out it was never screwed back into the floor, the tile underneath was totally undamaged. Betty and I sanded the walls down in the kitchen to prepare them for future plastering and patching. All of this sanding caused the entire house to be filled with this fine yellow dust. We wore masks but it's going to take forever to eradicate all this dust. It's too fine to be caught in the vacuum filters (therefore gets spewed back into the room in a giant dust cloud), too thick for a swiffer, too fine for a broom and covering everything. I'm just glad our furniture isn't in yet.

Jun 18, 2010

Morning Light


In the early morning this time of year, the sun shines through the stained glass window and casts pretty colors on the gray wall. Isn't it lovely? I can't wait to spend all my mornings here.

Bathroom Update

I wish I had taken pictures of the giant shower holes. But I left my camera at work and as of this morning it's fixed; we had a carpentry crew in there to do the job early (supervised by my dad, who cleared his schedule so we could go to work - thanks Dad!). They actually ripped out the whole plaster wall, tub to ceiling, in that section and replaced it with one large cement board to ensure that there are no patch seams under the shower flow. If we had tried to do this ourselves it would have taken a whole saturday, we'd be way behind schedule and honestly I'd be worried about water leakage down the road. We'll get to try our hand at giant hole patching in plaster when we rip out the medicine cabinet. Joy!

Tonight is our crazy, insane push to finish tiling the shower. We still have to tile around the window, half the long wall and the biggest challenge of all - cutting the tiles around the plumbing. If we get it done, we're on track - grouting tomorrow, sealing Monday, Tuesday tub re-glazing. Our plumber comes back Monday to hook up our vanity sink and solder on the shower hardware.  We also want to get the window scraped and repainted/sealed if we can squeeze that in before Tuesday and maybe even put up the privacy film that we bought. And we have to fix the shower curtain rod and get it back up. Everything else is cosmetic - it will get done when it gets done.

I can't believe we move in just a few more days. There's so much to do it's scary. Luckily we have some wonderful helpers who have volunteered to come over to our half air conditioned house in the ridiculous heat and do some manual labor.

Jun 16, 2010

What to do with the Walls?


Upstairs hall walls in mauve

Last night while tiling we considered the bathroom walls. They are in terrible shape. Thanks to a lot of poor patchwork, large cracks, crags and holes - they are in worse shape than the kitchen. No wonder they hid everything with wallpaper. In our upstairs hallway, the plaster problems are hidden behind some textured paintable wallpaper that I am actually quite fond of. Mike tolerates it. So we are now considering a second option to a massive repair job on the walls - paintable wallpaper in a different pattern. We haven't decided either way, we're still debating what would be more painful and time consuming since wallpaper isn't exactly a cinch to hang. They do have some interesting options out there- patterns, stripes, textures, plain...

Jun 15, 2010

Upstairs Bathroom

All I want at this point before we move in is to have a working bathroom. This project has taken priority over everything else and will get most of our attention until it's finished. The main bath in the house needs a pretty major face lift. Points in its favor: new tile floor, new toilet and a linen closet. Detractors: the linen closet needs refinishing inside, the outdated vanity, sink and faucet, the old shower hardware, the peeling paint on the window, the too-small original medicine cabinet, the exposed radiator, the corrosion in the tub, and the totally bizarre wooden shower cubby with lid. The biggest problem of all? The wallpaper. Everything, including the shower was wallpapered.

Wearing masks and terrified of finding mold, we removed layers and layers of wallpaper and got the walls down to the plaster. The parts treated with a water-proofing sealant were completely mold free. In the regular plaster, places that received the most water while showering had just a few small specks that disappeared in less than 5 seconds with a spray of bleach. Over the weekend Mike took out the vanity and the sink so we could get everything ready for our new vanity.


Our plan for the shower is to use white subway tile from the tub up to the ceiling all the way around. We chose subway tile specifically because it goes so well stylistically with our 1920s home. Since the premiere of the subway system in 1905, according to This Old House, subway tile was all the rage through the 1920s. With the tall ceilings and long walls, it's a lot of tile and a lot of work to cover everything, but we wanted to accentuate the height and have continuity. We also decided to board up the strange cubby with a lid at the end of the tub and turn it into a tub shelf, removing the cracked lid and boarding it up, waterproofing and then tiling over the whole thing. This past weekend, we managed to tile the back wall of the shower. We couldn't do any more because 1) we ran out of thinset, 2) we ran out of time, and 3) the plumber came today and had to poke giant holes in the wall around the hardware and we didn't want to have our work damaged.


 The tub re-glazers are coming Tuesday. We have a very tight schedule to finish tiling, and a pretty big wrench in it. Like I just mentioned, the plumber found some major issues in our pipes when changing our our shower hardware. He fixed it the best he could, but if we want optimal water pressure the bathroom requires a full gut and remodel because the problem is under the tub. And now we have giant holes in the wall around the hardware that have to be fixed. Then when the plumber tried to fix our drain, he had to go in through the half bath ceiling, poking another giant hole with tons of debris flying everywhere. The whole drain turned out to be shot - leaking into the ceiling and causing rot, so now our whole ceiling has to be replaced in there. And it turns out the drain was like 98% clogged with something that looks like old plaster. The good news - we caught it early and won't have any more problems, where it could have become a devastating disaster down the road. The bad news - it was a huge, all day job to fix and the plumber charges hourly. And he has to come back to finish the rest of it. It's the first major unexpected dent to our meager home improvement budget. We know to expect this kind of thing with old houses, and we're relieved it's fixed and fixed right, but it still hurts.

From my previously posted to-do list, here's the rest of the plan again:
  • Fix the giant holes in the shower wall
  • Sand, prime, paint and seal the window sill the best we can to protect it from rot and future water damage.
  • Cover the window itself with a layer of translucent contact paper for additional privacy.
  • Re-glaze the bathtub (the appointment is scheduled for next Tuesday the 22nd)
  • Install the new vanity and have the plumber hook up the new sink and faucet (plumber's next visit)
  • Remove the old medicine cabinet to reuse in the downstairs bathroom and install the new one
  • Repair, sand, smooth, prime and paint bathroom walls for a clean finish
  • Sand and re-paint the existing shower curtain rod
  • Buy and install new towel rods and hardware
  • Clean, sand, repair, prime and paint the linen closet (sanding done by Katie on Saturday, Sunday I repaired the cracks)
  • Remove the current light fixture above the vanity and install the new one
  • Install GFI outlets in the bathroom (electrician)
  • Add a bathroom fan/vent to pull the steam outside
  • Eventually cover the radiator with a radiator box (a future project planned for all the radiators)

Jun 14, 2010

From the Weekend

What did we do this past weekend?

We scheduled the plumber, met with another electrician, disconnected the bathroom sink and removed the vanity from the bathroom. The old sink was so heavy we left it in the office, because who doesn't want an old upside down sink as decorative sculpture? Our new vanity still remains in its box downstairs and makes an excellent table. Shannon brought over her old air conditioner (thank you!) and it also weighs 150 lbs. Katie came all the way out from the city to sand my linen closet and sand all the shelves, (thank you!) for an afternoon of dust mask wearing fun. Mom, my official locksmith, installed the new door handles in deadbolts in the front and side doors and put up half of the wallpaper in the living room. Mike became a wet tile saw expert and we together we tiled the entire far wall of the shower from floor to ceiling.


And Georgia is tired from all the work. We made her do all the tile cutting on the wet tile saw until she started pushing for unionization.

Stripped: Rooms without Wallpaper

It started small with the half bath downstairs. Layers and layers of wallpaper peeled off the walls in large sheets, yellowed with age. While it was a dusty job (all that aged crumbling plaster came down too), thanks to a dust mask it wasn't so bad and surprisingly satisfying. We stripped the paper all the way down to the original plaster. Over the first weekend in the house we hit the kitchen, creating piles and piles of old paper. And it only took a couple hours the following Monday night to completely remove all the paper in the upstairs bathroom.

It doesn't look like progress... it doesn't really even feel like progress. But it is progress...


Living Room, Painted

The living room was the second room to be painted. I needed to "eradicate" the mauve and make the downstairs of the house actually feel like ours instead of a space we're borrowing. Painting is an easy win to make a place feel more homey, even without furniture. We hung up a piece of the wallpaper to see how it will all eventually come together. We're holding off painting the stairwell and upstairs hallway until after the movers bring in the furniture since they will probably scuff up the walls.

So here's the living room plan for the walls:


So far it's been painted the rockport gray, which i am in love with. Here are the before and after photos:


(please note: the pink ruffle curtains only remain up for privacy until we unpack and install our own. Anyone interested in something lacy and pink before I donate them?)

Dining Room, Painted

The dining room was painted first thanks to my mom, who sacrificed half a vacation day to spend the afternoon with a paint brush in her hand. Mike and I helped of course once we got out of work, but the credit really goes to mom for this one. I am really pleased with the soft sage green color, it's such a huge difference from the mauve. I can't wait to see what the room will look like once I have real furniture in here instead of my patio set and folding chairs!


Paint Colors

*Updated in 2019*

I love Benjamin Moore paint. I could wax poetic on the colors, quality and consistency then lecture on the its more environmentally friendly qualities and how it supports small businesses by not being available in the big box stores.

I am particularly smitten with their Historical Collection, a selection of tried-and-true can't miss paint colors that coordinate well. No glowing neon wall colors here. And while these colors will look good in any home I was very excited to use historical colors in our historical house.

 Here's our current house palette (in 2019 everything below this point has been updated):

Living room: rockport gray (with firefly yellow in the wallpaper)
Stairwell: edgecomb gray
Dining room: salisbury green
Kitchen: edgecomb gray + white dove cabinets
Half bath: firefly yellow (with the same wallpaper as the living room)
Playroom: palladian blue
Upstairs hall: edgecomb gray
Main bath: guilford green
Master bedroom: palladian blue
Oliver's room: weston flax and hale navy
Matt's room: hollingsworth green

When this post was originally written, only the living room and dining room had been painted. We've come a long way since then....

Hello Little Yellow House

A couple weeks ago, we bought our first house. We've been working on it nonstop since the first night when the keys were in our hands, getting it ready for our official move-in date of June 23rd. We thought we'd try a blog to share our progress with everyone and keep ourselves motivated.


We set some pretty lofty goals for our move-in date:
  1. Have an electrician add more circuits to our 5 circuit house (which won't happen until after the 23rd)
  2. Have a plumber replace corroded pipes in the basement, add a water line for the fridge, hook up our bathroom plumbing.
  3. Prep, prime and paint all of the closets
  4. Finish the main bathroom:
  • Remove the wallpaper
  • Repair, prime and paint plaster walls
  • Tile the shower
  • Board up, waterproof, and tile over the strange bath cubby with lid
  • Re-glaze the bathtub
  • Have a plumber install new shower hardware
  • Buy and replace the vanity, sink, and faucet
  • Prep, prime and paint the linen closet
  • Sand and re-paint the existing shower curtain rod
  • Scrape, sand, prime, paint and seal the window sill (to protect against water)
  • Buy and replace the towel rods
  • Buy and replace the medicine cabinet
  • Buy and replace the vanity light
  1. Kitchen upgrades:
  • Remove wallpaper
  • Repair, prime and paint plaster walls
  • Replace counters with butcher block
  • Tile the back splash with leftover bathroom tile
  • Sand, repair, prime and paint cabinets white
  • Rehang cabinets, cabinet doors and install new hardware
  • Remove the low table counter
  • Replace floor tiles where damaged
  1. Paint the dining room
  2. Paint the living room
  3. Scrape, sand, prime and paint dining room and living room windows
  4. Remove carpet from the upstairs office
  5. Remove carpet from the guest room
  6. Move all of our boxes from the apartment to the house
Now that we have 1.5 weeks left until we move, our goals have scaled back considerably. We were warned everything takes a lot longer than you think to get done. It's so true - there just aren't enough hours in the day. The dining room and the living room have been painted, the plumber is coming tomorrow, and we'll hopefully get the carpet up and the closets done. The big goal? I just want the bathroom usable. It doesn't have to be painted, pretty or finished, I just don't want to have to wash my hair in the basement laundry sink.