Jul 29, 2011

Around the Patio: Landscaping & Finishing Touches


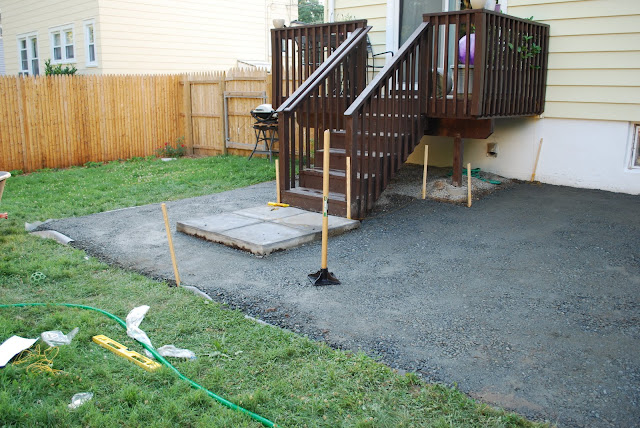
While the patio was officially built, there were a few more things we had to do before we could officially call this project finished.  And the biggest thing we had to do around the patio was landscaping.  We needed to re-grade the lawn around the pavers so there would be a gentle slope away from the patio instead of a sharp drop.  And we wanted to hide the ugly edging.  When we dug out the patio base, we created a large dirt pile on the driveway.  The dirt pile was moved back around the patio to create a gentle slope.

Originally we tried so save some of the sod from the lawn we dug away.  We placed it in the back under trees in the shade - a strategy that worked well when we worked on the garden to keep it alive.  Unfortunately the heat wave (with highs in the mid-100s) cooked all of the sod pieces and none of them survived.   So instead we have to re-seed this part of the lawn when the horrible heatwave is over. 

This awkward space will be landscaped with mulch and small shrubbery.

We plan on filling the empty space between the patio and the driveway with some mulch and a few small shrubs like miniature boxwoods to visually separate the patio from the driveway and the driveway gate.  It will help give this odd section a more finished look.   We didn’t want the patio to follow the edge of the driveway so that we could continue to open the driveway gate (the patio is much higher than the driveway there) and so that we didn’t risk damaging the driveway base when digging everything out.

Jul 28, 2011

Patio Building: Filling the Gaps

The next step towards finishing our patio was to fill the joints with polymetric sand.  This is the special sand that turns to a cement-like consistency when you wet it.  It gives us extra security to keep the pavers from shifting and also helps prevent weeds and ant hills.  It also gives the pavers a smooth finished look, like grout between tiles.  Any mistakes are blended in and forgiven.


To install the sand, we poured some over the pavers and then worked it into the cracks with a broom.  Because it turns to something like cement when wet, once the cracks were filled we blew down the pavers with a blower to make sure nothing was left on top.  Then we turned the hose and wet everything down with a gentle spray.

We also installed the plastic patio edging once again around the patio.  Using stakes we secured it to the ground pressed firmly against the pavers.  Long term the edging will further help prevent things from shifting.


The end was finally in sight - our patio project was almost at a close.  All it needed was some landscaping and finishing touches.

Jul 27, 2011

Patio Building: Laying Pavers

It was finally time to start laying the pavers and we were very excited about everything coming together.  It was a ton of hard work and we were exhausted at this point (the excessive July heat wave really wasn’t helping).  First we tried laying down the plastic edging that holds everything in because it seemed easier to keep the pavers in place from the start.  However, the edging was slightly curved from the supplier and the curve was obviously messing up our lines early on, so we pulled it up and decided to do it at the end instead (we’ve read instructions and it can be done before or after).


Starting in the corner against the house, we began carefully laying the pavers.  Each paver was laid firmly against the other and we gently tapped each one into the sand with a rubber mallet.  The pavers were laid out in a 2-1 herringbone pattern.  We had to take a lot of care to make sure that everything was perfectly even and all the same height.  When a paver was too high, we used more force with the mallet.  When a paver was too low, we pulled it up and added extra sand underneath.  We constantly checked everything with a level to make sure everything was the same height.


Due to our sand shortage issue, we did the pavers in two parts.  We did the largest section first that we had sand for.  And once we picked up the remaining sand bags and put that down, we did the pavers around the cement slab and the smaller left section of the patio.


Even though we made a straight edged patio, there were still certain sections that required cutting (like around the edges).  We saved these pieces for last.   Instead of renting a pricey industrial saw to cut the pavers, we had heard it was possible to use a wet tile saw.  One can either make slow progress with multiple cuts on each block or risk fingers and hand by removing the safety apparatus.  Of course we would never recommend doing any modifications to a wet tile saw that would endanger the user... 


Once we got the final pieces in, we were ecstatic.  Elated.  We couldn't believe how far we’d come and how long it took.  Of course we still weren’t quite done yet, but we could finally see what the finished product was going to look like.

Jul 26, 2011

Patio Building: Sand


The next layer for the patio base was a 1 inch layer of sand spread evenly over the gravel.  It was actually really easy.  The trick to getting it perfectly even is to use 2 1-inch pvc pipes as a guide.  We started in the far corner and went across, working in rows away from the house.  Once you lay the sand you can’t walk on it again.


You dump a load of sand between and over the pipes.


Scrape off the excess with a leftover 2x4.  (And if you don’t have a leftover 2x4 lying around, you’re not ready to build a patio.)


Carefully remove the pipes and fill in the divets by hand.  Repeat.


Unfortunately we ran out about 60% of the way through.  The delivery was obviously significantly short because we were very careful with the sand.  We called the supplier we bought everything from, but they wanted to charge us for the additional sand and another full delivery fee!  They were the ones that calculated the amount we needed and delivered it, but they refused to fix their mistake.  Their stance was that it was “impossible” that the wrong amount of sand could have been delivered.  I suggested that maybe the amount was miscalculated, and we’d be happy to pay for the additional sand if they would waive the excessive delivery fee.  They said their calculations for supplies were for “advisory purposes only” and it was our responsibility to make sure they were correct while purchasing.  Worse they then accused us of improper installation - their attitude was “well you can’t prove that it wasn’t your fault, so it’s not ours.”  I told them they were welcome to come over to our house and check our work.  I guess you get what you pay for - Morris Brick was significantly cheaper for the same brand of materials, but they obviously cut corners and lack decent customer service.

We definitely won’t be using them again.  Instead we went to Home Depot for more sand.  For the amount we needed, it was much easier and cheaper to pick up 15 bags of sand on our own to finish the job.

Jul 25, 2011

Patio Building: Compacting Gravel


There was a mad rush to get all of the gravel down because we only wanted to pay for one day of the compactor rented from Home Depot.  Once the gravel had been evenly distributed, we wet everything down with the hose (it helps with compaction) and brought the compactor back out.  While Mike had mastered the plate compactor to compact the dirt base, it was my turn to take it for a spin on the gravel.


The compactor did everything in about 20 minutes and created a super solid rock hard surface.  I can honestly say that while the compactor was big, heavy and difficult to turn - it was much easier than ever attempting to do the whole thing with a hand tamper.   It did a beautiful job compacting the gravel base.  The cons are that it’s incredibly heavy, difficult to turn, and off switch and speed controls are out of reach when you are in a tight spot.  Despite its size and weight, I only had one mishap where it ran amok under the deck.  I found that it was impossible to do the corners with the plate compactor, so we were glad to have the hand tamper on hand to finish everything off.


My experience with the plate compactor just reinforces our recommendation - anyone who’s building a patio should definitely rent one for a day and save yourself a lot of trouble.  If I can wield one successfully without incident or injury (and I’m incredibly clumsy), anyone can.

Jul 22, 2011

Garden Girl


Georgia loves to “help” me in the garden.   She follows me outside and is the first one through the garden gate.  Various garden activities include: laying on the cool pathway rocks, licking water from the exposed soaker hoses (when they are on), sniffing the plants, eating grass, and checking out every single item I pick and put into the bowl.


Jul 21, 2011

Patio Building: Hauling Gravel


After the patio area had been dug out, tamped down and covered with weed block fabric, we could finally start building the patio base up with gravel (or “quarry process”).  We hauled over 3.5 cubic yards in our wheel barrow from the pile next to the garage to the patio area.   Then using shovels and a rake, we spread out a 4 inch layer of gravel as evenly as possible, building up the level slowly until we reached the proper height below the lines and stakes.


Moving that mountain of gravel took forever and we were in a terrible rush.  It was hot and horrible in the blazing sun.  We shoveled scoop after scoop of gravel until we were dizzy and our arms felt like they were going to fall off.  Then we scooped some more and more until the pile was next to nothing.  We only wanted to pay for one day of plate compactor rental and the gravel had to be compacted as well, so there was a lot of pressure to finish it in one day.   We managed to get it done... at a price.  Despite several reapplications of SPF 50 and spraying ourselves with the hose, sunburn and heat rash ensued.   We did our best to stay hydrated, but it was exhausting in the summer heat!

Jul 20, 2011

Patio Building: Weed Blocking Fabric


Once everything was dug out and compacted, we put down a layer of water-permeable weed blocking fabric.  We purchased the higher grade contractor quality fabric - it’s a little more expensive, but it was worth it to know this was being done right.   We secured it in place with ground staples (weirdly marked “crampons” at Home Depot) and a hammer.


Even though the patio is 300 square feet, we bought 400 square feet of fabric and barely had enough because it requires a 6-12 inch overlap between rows.  Putting the fabric down is easy, but definitely a two person job on a breezy day so that the fabric doesn’t blow away before one tacks it down.

Jul 19, 2011

Patio Building: Dirt Tamping

The finished result

Once we dug out the dirt for the patio, it was time to compress the ground below to create a solid base.  While some sites (including the Lowe’s videos we liked) recommend renting a professional compactor, we’ve heard and read a lot of mixed reviews about them.  A lot of DIYers found that they were unwieldy and difficult to control.  So we first tried to manually tamp down the dirt with a hand tamper we purchased.

While we knew it would take more time and a lot more sweat and labor, we had no idea how much.  It was almost impossible to get the ground flat enough (despite the flat shovel there were still ridges) and it took extraordinary effort to make any progress.  We realized it would take the entire weekend just to tamp the ground - so it was decided we would rent a plate compactor from Home Depot the next morning.


The plate compactor was definitely really heavy and a little difficult to maneuver, but it made quick work of the ground compacting.  Worth every penny- Mike was done in about 20 minutes.  We found that the biggest challenge was getting it in and out of the car due to its awkward and heavy weight (I have a small SUV and it fit just fine with the seats down in back).  Mike said it was also challenging to make turns and get the corners compacted, but overall he quickly mastered the machine.   Advice to anyone who’s ever going to build a patio - spend the extra money and rent the plate compactor for 24 hours - it’s worth it!


We're really glad we had the hand tamper for the corners though because the plate compactor didn't work in those spaces.  But it's a lot easier to hand tamp a couple of small spots than 300 square feet!!

Jul 18, 2011

Patio Building: Digging out


We knew digging out the patio was going to be horrible.  Doing the space for our garden in early spring was awful and the temperatures were mild.  In July the humidity is high, the sun is strong, and the temperatures are regularly in the high 80s and 90s.  Common sense would dictate that we wait for for the fall - but we want to actually enjoy our patio this summer so we’re trudging forward.  Just slowly so we don’t suffer heat stroke.

Before laying the pavers, one has to lay the base material - 4 inches of gravel (or “quarry process”) and then 1 inch of sand.   So we have to dig down 7 inches to accommodate the height of the paver, the layer of gravel and the layer of sand.   And while digging this out, we have to make sure we are sloping the grade away from the house - 1 inch every 4 feet (or ¼ inch every foot).   That’s where the mason lines, stakes, a yardstick and line levels come in handy.

We dug out the space by first removing the sod, then digging down to the proper depth using a yardstick to mark our progress.  Some parts were more than 7 inches, some parts much less.  A flat shovel helped dig out a level surface (as opposed to a curved spade that leaves a dip) that was carefully monitored with a level and a yard stick against the mason lines.  The next step was to compact the ground for a solid surface to lay the base materials on.

Jul 15, 2011

Patio Preparation


Before we even embarked on this giant patio project, we did some research.  We read DIY guides online, we talked to the folks at the building supply stores, and we watched how-to videos.  The most helpful guides we found were actually videos from Lowes  - How to Design Your Patio, How to Lay the Patio Foundation, and How to Install a Paver Patio.  We decided on a shape, measured out the space, calculated the square footage, decided on the materials and pattern, shopped around for the best price, then finally placed our order.

Once the materials arrived, our first step was to prepare the area for the patio.   We used stakes, mason line and these handy line levels to mark the size, shape and grade of the patio we’re about to dig out.   We put stakes at every corner of the patio, then strung the mason line between each stake.

To properly set up the mason lines at the right grade, the first thing we did was make sure all of the strings were level using the line levels that hang right on the line.  We used the height of the cement slab to determine our starting point for the tops of the pavers, knowing we had to dig 7 inches down from that point.  We marked “zero” on the closest stake and raised the line 8 inches to accommodate the slope towards the house (so that the level lines would be above ground in all places).   Then we adjusted the height of the string line to accommodate the grade away from the house - 1 inch every 4 feet.  The patio goes about 16 feet out from the house, so it has to drop 4 inches end to end.  We made all of those height adjustments to the knots at each post.


We also installed diagonal lines going across the patio areas to help us make sure we dig out everything to the right depth and keep the proper grade.  As we dig we’ll use a level and a yard stick to measure and make sure we’re preparing the area properly.


Now it's time to dig out 300 square feet in the sweltering July heat.  Yes we’re a little crazy. But we’re going to go slow, take our time and share our progress along the way.


And so it begins...

Jul 14, 2011

Garden Success/Excess


What do you do when you have more garden produce than you can eat, even after you’ve given most of it away?  (And already filled the freezer.)

Make pickles of course!  We made pickled green beans and cucumber pickles.  And for the zucchini, we mad a big batch of zucchini marmalade (also known as zucchini butter).


And just in case you find yourself with a bounty from the garden, a neighbor, or the farmer’s market this summer - I thought I’d share my favorite quick and easy recipes.  Recipes for really busy people that make you look like a gourmand ("Who me? Of course I make my own pickles!").  All it takes is a few pint size glass jars (I like these from IKEA but even clean spaghetti sauce jars will do) and about 5 minutes of work for pickles and 20-30 minutes for zucchini marmalade.  Both will keep for a month in the fridge without canning (which is too much effort right now).

Pickles
Adapted from Jam it, Pickle it, Cure it

1 lb of cucumbers or green beans (enough to fill jar)
1 tablespoon dill seeds
1 tablespoon yellow mustard seeds
1 bay leaf
1 tablespoon black peppercorns
1 tablespoon kosher salt
5 cloves of garlic, peeled and crushed
white vinegar

Fill the jar with the vegetable of choice. If using cucumbers, slice lengthwise into spears. If using green beans leave the ends on but remove stems. Add the spices and garlic. Fill the jar halfway with white vinegar, then top off with cool water until the jar is filled. Seal the jar.  Shake to mix.  Let it sit in the fridge for 3 days, then enjoy!


Zucchini Marmalade
Adapted from the Kitchn

2 lbs of zucchini (more or less, whatever you have on hand)
1/4 cup of olive oil
2 minced shallots
2-4 cloves of garlic minced
fresh thyme (or dried)
salt and pepper

Coarsely grate zucchini or chop finely in a food processor. Squeeze out water with a towel or let drain in a colander for 5 minutes.

In a big skillet heat olive oil and saute shallots and garlic for 2 minutes. Add zucchini and cook over medium heat for 5 minutes, stirring frequently.  Add salt and pepper and thyme, continue to cook, stirring frequently until the zucchini caramelizes into a bright green jam.  The cooking time depends on the amount of zucchini you have. If you burn the bottom, turn down the heat and scrape the caramelized parts into the marmalade for extra flavor.

Store in sealed glass jars in the fridge. I like to heat it back up and eat it on baguette slices, though it also works well as a side dish, on crackers, or in a salad.  It tastes very fresh and summery.

Jul 13, 2011

Refinishing the Patio Furniture - Sealed


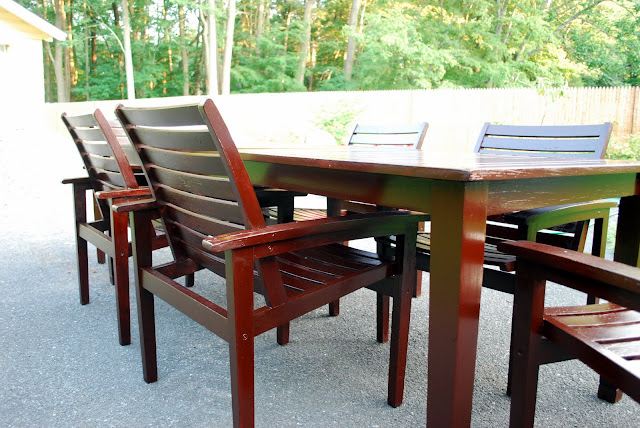
After staining the patio set a beautiful dark mahogany color with some gel stain, we had to add extra protection to keep it looking nice with a sealant from the Minwax Helmsman collection.  Two coats on every single side (including in between the slats) took a long time.


Of course it doesn’t look any different since the coats are clear (with a 24 hour dry time in between), but now the set is ready for use... on the driveway.  Until of course we finish the patio.

Jul 12, 2011

Patio Delivery


The patio pavers, gravel, sand and other materials have been delivered!  They arrived at 7:41 am Monday when the delivery window was between 8am and 10am.  We did not have the back driveway cleared yet and everything looked like the way we had left things Sunday night.  Instead of leisurely moving everything off the driveway a few minutes before 8:00, we had a mad dash to move our cars, bags of dirt, the garbage cans, the fire pit, the potted plants, the red chairs, the wheel barrow, the patio furniture...  Nothing like a little panic and adrenaline to get things moving in the morning!


It took two dump trucks and a pallet truck with a fork lift to get everything delivered.  The gravel is in front of the garage, the sand in the apron (covered by a tarp so that it won’t wash away in a thunderstorm), and the pavers on the grass.   The pavers will burn the patch of lawn they are sitting on, but weighing in at over 3 tons we did not want them sitting on the driveway for an extended period of time.  It’s a lot cheaper to reseed the lawn!

Jul 11, 2011

Bad Deer!

We came home to this today:


That is was our new oak leafed hydrangea.  All the thunderstorms we've been having must have washed away all the deer-off, because today a deer had it for lunch.  Nothing else was bothered or touched.  I'm furious over it...